Categories
Posts

Faking HTML5 Boilerplate Header with Thematic

I have faked the HTML5 Boilerplate header styling on my Thematic Theme Framework child themes for a while now. I say faking only because this header is typically associated with HTML5 layouts and while Thematic is a solid framework, the code is just not as modern as it could be. Using the HTML5 Boilerplate header method adds a little functionality, while looking cleaner and more modern to the untrained eye when viewing the source code.

HTML5 Boilerplate Header for Thematic

Originally I would pull the header.php from Thematic into my child theme and comment out 2 lines which felt very dirty by creating one more file. Eventually after a little thought, I figured out it is possible to do this all in the functions.php of your child theme.


// recreates the doctype section, html5boilerplate.com style with conditional classes
// http://scottnix.com/html5-header-with-thematic/
function childtheme_create_doctype() {
    $content = "<!doctype html>" . "\n";
    $content .= '<!--[if lt IE 7]> <html class="no-js lt-ie9 lt-ie8 lt-ie7" dir="' . get_bloginfo ('text_direction') . '" lang="'. get_bloginfo ('language') . '"> <![endif]-->' . "\n";
    $content .= '<!--[if IE 7]> <html class="no-js lt-ie9 lt-ie8" dir="' . get_bloginfo ('text_direction') . '" lang="'. get_bloginfo ('language') . '"> <![endif]-->'. "\n";
    $content .= '<!--[if IE 8]> <html class="no-js lt-ie9" dir="' . get_bloginfo ('text_direction') . '" lang="'. get_bloginfo ('language') . '"> <![endif]-->' . "\n";
    $content .= "<!--[if gt IE 8]><!-->" . "\n";
    $content .= "<html class=\"no-js\"";
    return $content;
}
add_filter('thematic_create_doctype', 'childtheme_create_doctype', 11);

// creates the head, meta charset, and viewport tags
function childtheme_head_profile() {
    $content = "<!--<![endif]-->";
    $content .= "\n" . "<head>" . "\n";
    $content .= "<meta charset=\"utf-8\" />" . "\n";
    $content .= "<meta name=\"viewport\" content=\"width=device-width\" />" . "\n";
    return $content;
}
add_filter('thematic_head_profile', 'childtheme_head_profile', 11);

// remove meta charset tag, now in the above function
function childtheme_create_contenttype() {
    // silence
}
add_filter('thematic_create_contenttype', 'childtheme_create_contenttype', 11);

HTML5 Boilerplate Style Header Benefits

  • While not as important to some, for me having the cleaner look to the document source is refreshing. It just looks cooler and more modern from a front-end developer perspective.
  • Thematic already provides the ability to read what browser you are using and provides a body class for you, but using a caching plugin completely kills the functionality. Instead this uses the conditional classes on the html tag giving you the ability to target those old pesky Internet Explorer versions.
  • It adds the no-js class for using Moderinizr, most people working with Thematic won’t probably need this, but it allows for the ability to the latest CSS3 techniques while still providing fallback support for older browsers, again, usually versions of IE.
  • 4-26-2012 – Now includes the meta viewport tag for correct scaling for responsive Thematic child themes. This is also the default for non-responsive themes and shouldn’t affect them at all.

New HTML5 Boilerplate Header Style

This is how the new HTML5 style code will appear in the header of the web page.


<!doctype html>
<!--[if lt IE 7]> <html class="no-js lt-ie9 lt-ie8 lt-ie7" dir="ltr" lang="en-US"> <![endif]-->
<!--[if IE 7]> <html class="no-js lt-ie9 lt-ie8" dir="ltr" lang="en-US"> <![endif]-->
<!--[if IE 8]> <html class="no-js lt-ie9" dir="ltr" lang="en-US"> <![endif]-->
<!--[if gt IE 8]><!-->
<html class="no-js" dir="ltr" lang="en-US">
<!--<![endif]-->
<head>
<meta charset="utf-8" />
<meta name="viewport" content="width=device-width" />
<title>Dev Site | Just another WordPress site</title>

Old XHTML Thematic Header Style

This is just for reference so you can see the differences between the above HTML5 version, and the XHTML version.


<!DOCTYPE html PUBLIC "-//W3C//DTD XHTML 1.0 Transitional//EN" "http://www.w3.org/TR/xhtml1/DTD/xhtml1-transitional.dtd">
<html xmlns="http://www.w3.org/1999/xhtml" dir="ltr" lang="en-US">
<head profile="http://gmpg.org/xfn/11">
<title>Dev Site | Just another WordPress site</title>
<meta http-equiv="Content-Type" content="text/html; charset=UTF-8" />

In short, I can’t see any reasons not to use this on every one of my child themes function.php files from here on out. If you aren’t using Modernizr, you can remove the no-js classes from the above HTML5 header. Keep an eye out for my next post which will take care of adding Modernizr to the Thematic Framework, it’s just a little overwhelming to include here.

Update: Added the meta viewport tag to aid in responsive child themes for Thematic. Also updated the formatting to the Thematic 0.9.8 svn version, it will work for the 0.9.7 versions, but is better formatted (no tabs/spaces in php) for the new version.

Update: Now works with the Thematic HTML5 Plugin by Karin at invistruct.com.

Update: This is no longer needed for Thematic 2.0+, however because it is such a pain in the ass to do if you need it, I will keep this information up just in case someone needs it.
Categories
Posts

Modifying the Thematic Date Format

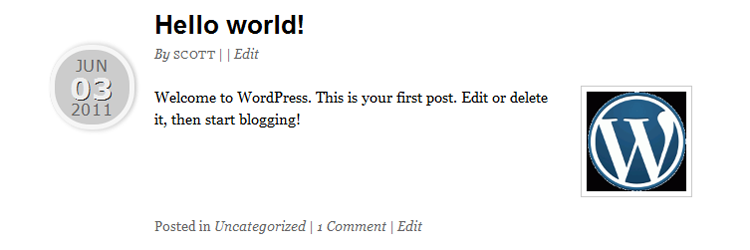
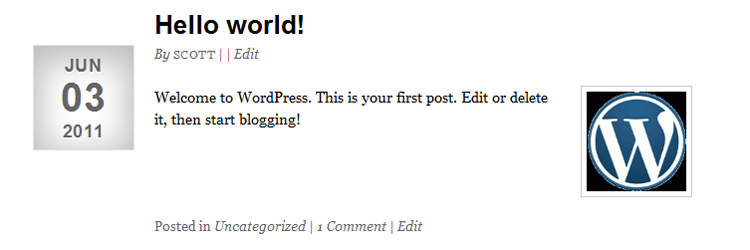
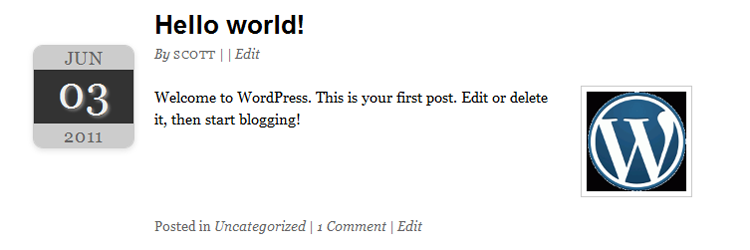
While helping someone recently with the Thematic Theme Framework for WordPress, I finally took the extra step and modified the date format (better known as postmeta_entrydate) to be easier to work with. Essentially all I did was modify the date for Thematic to include a few extra span tags that can easily be targeted with CSS. While this is a highly requested feature, I just haven’t had to implement it yet, so after putting it off for long enough, here it is in 3 default styles.

With the current setup, it is intended to be a copy paste solution for starting a Thematic Child Theme and the styling is by no means mandatory. With a little CSS love, you could easily achieve tons of variations since the PHP is all that is required to give you the needed hooks for styling the date.

PHP for Modifications to Thematic’s Date

Insert into your functions.php in your child theme folder.


function childtheme_override_postmeta_entrydate() {
	$entrydate = '<span class="meta-prep meta-prep-entry-date">' . __('', 'thematic') . '</span>';
	$entrydate .= '<span class="entry-date"><abbr class="published" title="' . get_the_time(thematic_time_title()) . '">';
	$entrydate .= '<span class="month">' . get_the_time('M ') . '</span>';
	$entrydate .= '<span class="day">' . get_the_time('d') . '<span class="sep">, </span></span>';
	$entrydate .= '<span class="year">' . get_the_time('Y') . '</span>';
	$entrydate .= '</abbr></span>';

	return apply_filters('thematic_post_meta_entrydate', $entrydate);
}

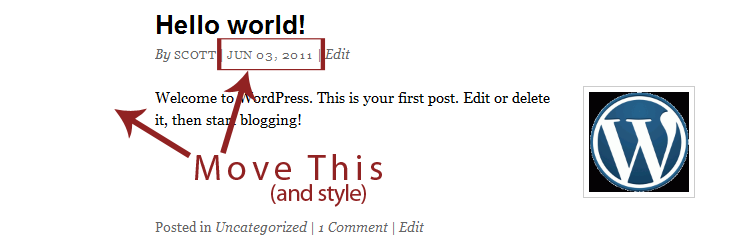
With the code inserted you won’t see any changes, remember all we are doing here is inserting span tags to style the date and give it some life. The code does not pull the date out of the .entry-meta div tag, it will remain in the markup right where it is intended which is the default setup, shown below.

Thematic Default Date Image

Styling your Thematic Date

I chose as a default to set the date on the outside of the post off to the left, to do this you will need to remove the overflow: hidden; out of the CSS, or override it using overflow: visible;. This is already included in the snippets below, but be sure to check out the examples below for some different styling techniques. Currently there are no images used, all the styling is done through CSS alone.

Custom Thematic Date Style 1

Thematic Calender Style Date Image

Insert into your style.css in your child theme.


#main, #content { overflow: visible; }
.entry-meta { position: relative; }
.entry-date { position: absolute; top: 0; right: 100%; width: 100px; background: #ccc; border: 1px solid #ccc; margin-right: 20px; border-radius: 10px; box-shadow: 0 2px 5px rgba(100, 100, 100, 0.2); background-clip: padding-box; }
.entry-date span { display: block; font: 18px/24px "Helvetica Neue", Helvetica, Arial, sans-serif; color: #666; text-align: center; }
.entry-date .month { background: #ccc; border-radius: 10px; }
.entry-date .day { font-size: 44px; line-height: 50px; background: #333; color: #eee; text-shadow: 2px 2px 2px #888; }
.entry-date .year { background: #ccc; border-radius: 10px; }
.entry-date .sep { display: none; }

I would refer to this example as a Calender Style Date format, it is pretty common and can easily be modified if you choose to use a little more robust graphic.

Custom Thematic Date Style 2

Thematic Circle Style Date Image

Insert into your style.css in your child theme.


#main, #content { overflow: visible; }
.entry-meta { position: relative; }
.entry-date { position: absolute; top: 0; right: 100%; width: 75px; height: 75px; margin-right: 20px; border-radius: 40px; background: #ccc; box-shadow: 2px 2px 3px rgba(100, 100, 100, 0.2), 2px -2px 3px rgba(100, 100, 100, 0.2); border: 5px solid #f6f6f6; }
.entry-date span { display: block; font: 16px/22px Verdana, Arial, Helvetica, sans-serif; color: #666; text-align: center; }
.entry-date .month { margin-top: 5px; }
.entry-date .day { font-size: 30px; color: #eee; font-weight: bold; text-shadow: 1px 1px #333; }
.entry-date .year {  }
.entry-date .sep { display: none; }

This circle is created through CSS, I would highly recommend checking all the available shapes you could change this to by looking into The Shapes of CSS by CSSTricks.com.

Custom Thematic Date Style 3

Thematic Foghorn Style Date Image

Insert into your style.css in your child theme.


#main, #content { overflow: visible; }
.entry-meta { position: relative; }
.entry-date { position: absolute; top: 0; right: 100%; width:100px; margin-right: 20px; border:1px solid #e6e6e6; border-bottom:1px solid #e3e3e3; padding:10px 0; text-align:center; letter-spacing: 1px; box-shadow: inset 0 8px 30px 8px rgba(0, 0, 0, 0.25); margin-bottom:20px; text-shadow: 0 1px rgba(255, 255, 255, 0.8); }
.entry-date span { display: block; font-size: 18px; font-family: "Helvetica Neue", Helvetica, Arial, sans-serif; font-weight:bold; color: #666; font-style: normal; text-align: center; }
.entry-date .month { }
.entry-date .day { font-size:40px; line-height:48px; }
.entry-date .year { }
.entry-date .sep { display: none; }

This style is modeled after the Foghorn WordPress Theme, you may have noticed that Foghorn is the base my current child theme is set up on. So really the credit for this style goes to Devin Price who produced the heart of the theme I use, be sure to check out his site, he does have some awesome WordPress Plugins, like the Options Framework Plugin.

Finishing off customizing the Thematic Meta

In the images, you may notice after the Author section there is now an extra | in the code. This is just the way the Thematic PHP is setup, you can either modify the postheader_postmeta function to remove it through PHP. Or just just set the .meta-sep-entry-date class to display: none;. If you need copy and paste solutions, choose one or the other below. I would recommended the CSS way just because it is by far easiest.

Remove meta separation from PHP


function childtheme_override_postheader_postmeta() {
  $postmeta = '<div class="entry-meta">';
  $postmeta .= thematic_postmeta_authorlink();
  $postmeta .= thematic_postmeta_entrydate();
  $postmeta .= thematic_postmeta_editlink();
  $postmeta .= "</div><!-- .entry-meta -->\n";
  return apply_filters('thematic_postheader_postmeta',$postmeta);
}

Or, remove meta separation through CSS


.meta-sep-entry-date { display: none; }

Any questions, just leave a comment. You can also find more information for Thematic Resources and Thematic Snippets, although both are still under construction and need some TLC, but are very useful nonetheless.

Categories
Posts

WordPress Columns Shortcode

A few months ago, I received a call asking if I knew how to make column shortcodes for a WordPress theme. I answered “No”, but quickly followed up with a explanation of how it should be fairly easy. The hunt for shortcode columns was on, after researching column shortcode examples, I noticed the ones out there were not very flexible when it came to styling. I kept thinking there has to be a better way and it wasn’t until making another shortcode for boxes that I figured out the columns and boxes could be merged into one single shortcode for a developer who wants total control with CSS.

This set of snippets can easily be modified into a plugin, take a look at creating a custom functions plugin for end users for directions. Also hopefully you have your basics down before tackling something like this, not recommended for anyone who doesn’t understand CSS and PHP, although the links in this article should help.

The PHP Columns Shortcode

Insert into your functions.php in the WP theme folder.


function snix_shortcode_columns( $atts, $content = null ) {
    extract(shortcode_atts(array(
	'size'  => 'full', // full width 100% is default
	'color' => '',
	'type'	=> '',
	'align'	=> '',
	'float'	=> '',
	'text'	=> '',
    ), $atts));

	$size = ($size) ? ''.$size : '';
	$color = ($color) ? ' '.$color : '';
	$type = ($type) ? ' '.$type : '';
	$text = ($text) ? ' text'.$text : '';
	$align = ($align) ? ' align'.$align : '';
	$float = ($float) ? ' float'.$float : '';

	if (strpos($size, "last") === false) {
	// if last is not found
	return '<div class="' .$size.$color.$type.$align.$float.$text. ' awesome-box"><span class="box-icon"></span><span class="box-content">' .do_shortcode($content). '</span></div>';
	}
	else {
	// if last is found
	return '<div class="' .$size.$color.$type.$align.$float.$text. ' awesome-box"><span class="box-icon"></span><span class="box-content">' .do_shortcode($content). '</span></div><span class="clearboth"></span>';
	}
}
add_shortcode('box', 'snix_shortcode_columns');

The CSS for the Shortcode Columns

Insert into style.css in the WP theme folder.


/*
	column box sizing - size=""
	default is full width 100%
----------------------------------------------------*/
.one_half, .one_half_last { width:48%; }
.one_third, .one_third_last { width:30.66%; }
.two_third, .two_third_last { width:65.33%; }
.one_fourth, .one_fourth_last { width:22%; }
.three_fourth, .three_fourth_last { width:74%; }
.one_fifth, .one_fifth_last { width:16.8%; }
.two_fifth, .two_fifth_last { width:37.6%; }
.three_fifth, .three_fifth_last { width:58.4%; }
.four_fifth, .four_fifth_last { width:67.2%; }
.one_sixth, .one_sixth_last { width:13.33%; }
.five_sixth, .five_sixth_last { width:82.67%; }
.one_half, .one_third, .two_third, .three_fourth, .one_fourth, .one_fifth, .two_fifth, .three_fifth, .four_fifth, .one_sixth, .five_sixth { float: left; margin-right: 4%; }
.one_half_last, .one_third_last, .two_third_last, .three_fourth_last, .one_fourth_last, .one_fifth_last, .two_fifth_last, .three_fifth_last, .four_fifth_last, .one_sixth_last, .five_sixth_last { float: left; margin-right:0;  clear: right; }
.full.awesome-box { clear: both; }
.clearboth { clear: both; display: block; font-size: 0; height: 0; line-height: 0; width:100%; }
/*
	column box defaults
----------------------------------------------------*/
.awesome-box { border: inset 1px solid #fff; margin-bottom: 20px; background: #f4f4f4; position: relative; -moz-box-shadow: 0 1px 3px rgba(0, 0, 0, 0.5); -webkit-box-shadow: 0 1px 3px rgba(0, 0, 0, 0.5); box-shadow: 0 1px 3px rgba(0, 0, 0, 0.5); border-radius: 5px; }
.awesome-box span.box-content { padding: 10px; display: block; }
.box-content h1, .box-content h2, .box-content h3, .box-content h4, .box-content h5, .box-content h6 { padding-top: 0; }
/*
	column box type - type=""
        alert is a custom box example
----------------------------------------------------*/
.none.awesome-box { border: none; background: none; -moz-box-shadow: none; -webkit-box-shadow: none; box-shadow: none; border-radius: none; }
.alert.awesome-box span.box-icon { position: absolute; top: 25px; left: -10px; height: 46px; width: 48px; background: url(../images/icon.png) no-repeat 0 -46px; }
.full.alert.awesome-box span.box-icon { position: absolute; top: -5px; left: -10px; height: 46px; width: 48px; background: url(../images/icon.png) no-repeat 0 -46px; }
.alert.awesome-box span.box-content { padding-left: 30px; }
/*	
	column box colors - color=""
----------------------------------------------------*/
.blue.awesome-box { background: #2daebf; }
.green.awesome-box { background: #2fc950; }
.grey.awesome-box { background: #a7a8a7; }
/*	
	column box float - float=""
----------------------------------------------------*/
.floatright.awesome-box { float: right; margin-left: 4%; margin-right: 0; clear: none; }
.floatleft.awesome-box { float: left; margin-right: 4%; clear: none; }
/* 
	coluumn box align - align=""
----------------------------------------------------*/	
.aligncenter.awesome-box { clear: both; display: block; margin-left: auto; margin-right: auto; float: none; }
.alignleft.awesome-box { display: block; margin-right: 4%; float: left; }
.alignright.awesome-box { display: block; margin-left: 4%; float: right; margin-right: 0; }
/*
	column box text - text=""
----------------------------------------------------*/
.textcenter.awesome-box { text-align: center; }
.textleft.awesome-box { text-align: left; }
.textright.awesome-box { text-align: right; }

The CSS shows possible options, but with fairly minimal styling. The shortcode attribute of size=”” will control the flexible widths, type=”” will allow you to have specific variations from your original default boxes. The type=”” attribute comes with 2 basic set ups for examples, .alert which inserts a icon and .none which overrides the CSS of the default to not show any options. The rest is fairly self explanatory, color, float, text and align which are just more CSS hooks so these boxes can do damn near anything.

You can download the image used for the icon type, it really isn’t necessary though since you will obviously want your own and really this is just a place holder. If you want it for a quick example, place the image in the root directory of your WordPress theme in the images folder.

Fixing wpautop in shortcodes

Insert into functions.php in the WP theme folder.


// clean up formatting in shortcodes
function snix_clean_shortcodes($content) {   
	$array = array (
		'<p>[' => '[', 
		']</p>' => ']', 
		']<br />' => ']'
	);

	$content = strtr($content, $array);
	return $content;
}
add_filter('the_content', 'snix_clean_shortcodes');

As mentioned in my WordPress Shortcode Buttons post, the little snippet above is needed only once to fix formatting on all shortcodes the auto line breaks <br> and empty paragraphs <p></p> inside the shortcodes without disabling wpautop and wptexturize completely. I would not recommend completely disabling the wpautop and wptexturize feature because all paragraphs and line breaks will need to be manually inserted which is a major hassle, especially for clients.

Drawbacks you should know

One thing you should absolutely know about is you can not nest these columns inside each other. Nested shortcodes get a little more complicated, if you needed nesting technically you could just reuse the PHP again, rename the shortcode from box to inner-box, the key is the PHP shortcode needs to have a different name to nest correctly.

You will need to manually insert the HTML into the boxes, so if you need a header and paragraph, these tags will need to be manually inserted. I really think this is half of what makes them very powerful though, so it just depends how you look at them. If you strip out the shortcodes you will still have correctly formatted text, careful attention was paid to keep these a styling element and not to promote poor coding practices summed up nicely on a article by Justin Tadlock called Dealing with Shortcode Madness. Pay close attention to his mention of the “lock in” effect which some other shortcode columns for do, ones with a “Title” as an attribute which handles headers in the columns would be perfect example.

Update: Justin Tadlock has created a Grid Columns shortcode plugin which trumps everything out there.

Categories
Posts

WordPress Buttons Shortcode

The idea for these shortcode buttons originally came from a tutorial on Adding Versatile Button Shortcodes to your WordPress Theme from mysitemyway.com, I highly recommend checking out their site for another reference on different buttons. Originally, I liked the simplicity of the tutorial, but wasn’t crazy about the wall of CSS accompanying them. Well come to find out after making my own with a modified Zurb.com CSS3 button, they ended up being pretty complex also, but they are still a viable option if you absolutely must have shortcode buttons for theme development.

Shortcode Button Example

This set of snippets can easily be modified into a plugin, it is not hard at all, you would be suprised, take a look at creating a custom functions plugin for end users for directions. Also hopefully you have your bases down before tackling something like this, not recommended for anyone who doesn’t understand CSS and PHP, although the links in this article should help.

The PHP Shortcode Button

Insert into functions.php in the WP theme folder.


// button shortcodes resources:
// http://tutorials.mysitemyway.com/adding-column-layout-shortcodes-to-a-wordpress-theme/
 
function snix_shortcode_button( $atts, $content = null ) {
    extract(shortcode_atts(array(
    'link'  => '#',
    'title' => 'View Link',
    'target'=> '',
    'size'  => '',
    'color' => '',
    'type' => '',
    'align' => '',
    ), $atts));
 
    $target = ($target == 'blank') ? ' target="_blank"' : '';
    $align = ($align) ? ' align'.$align : '';
    $color = ($color) ? ' '.$color : '';
    $type = ($type) ? ' '.$type : '';
 
    $out = '<a' .$target. ' class="' .$size.$color.$type.$align. ' awesome" href="' .$link. '" title="' .$title. '"><span></span>' .do_shortcode($content). '</a>';
 
    return $out;
}
add_shortcode('button', 'snix_shortcode_button');

If you are really paying attention, you will see some differences, the big ones being the option for a title on the links, the span is a little more flexible for doing some fun things with images and icons and some extra css hooks. Other than that, it is basically the same set up. The CSS is where it gets quite different.

The CSS for the Shortcode Button

Insert into style.css in the WP theme folder.


a.awesome, button.awesome { position: relative; display: inline-block; margin-bottom: 18px; padding: 10px 15px 9px; background: #222; color: #fff; text-decoration: none; font-weight: bold; line-height: 1; font-size: 12px; text-shadow: 0 -1px 1px rgba(0, 0, 0, 0.35); cursor: pointer; -moz-border-radius: 8px; -webkit-border-radius: 8px; border-radius: 8px; -moz-box-shadow: 0 1px 3px rgba(0, 0, 0, 0.5); -webkit-box-shadow: 0 1px 3px rgba(0, 0, 0, 0.5); box-shadow: 0 1px 3px rgba(0, 0, 0, 0.5); border-bottom: 1px solid rgba(0, 0, 0, 0.25); }
button.awesome { border: 0; }
a.awesome:hover, button.awesome:hover { background-image: url(images/button-overlay.png); text-shadow: 0 -1px 3px rgba(0, 0, 0, 0.35); }
/* button sizes ---------- */
.small.awesome { font-size: 12px; padding: 8px 10px 8px; }
.medium.awesome { font-size: 14px; }
.large.awesome { font-size: 18px; padding: 14px 15px; }
/* button colors ---------- */
.blue.awesome { background: #2daebf; }
.green.awesome { background: #2fc950; }
.grey.awesome { background: #a7a8a7; }
.red.awesome { background: #e33100; }
.magenta.awesome { background: #a9014b; }
.orange.awesome { background: #ff5c00; }
.yellow.awesome { background: #ffb515; }
/* specific button types ---------- */
/* speak option */
.speak.awesome { -moz-border-radius: 9px; -webkit-border-radius: 9px; border-radius: 9px; }
.speak.awesome span { position:absolute; bottom:100%; left: 30px; height:0; width:0; border-color: transparent transparent #222 transparent; border-style: solid; border-width: 12px; }
.blue.speak span { border-color: transparent transparent #2daebf transparent; }
.green.speak span { border-color: transparent transparent #2fc950 transparent; }
.grey.speak span { border-color: transparent transparent #a7a8a7 transparent; }
.red.speak span { border-color: transparent transparent #e33100 transparent; }
.magenta.speak span { border-color: transparent transparent #a9014b transparent; }
.orange.speak span { border-color: transparent transparent #ff5c00 transparent; }
.yellow.speak span { border-color: transparent transparent #ffb515 transparent; }
/* sign options */
.sign.awesome { -moz-border-radius: 0; -webkit-border-radius: 0; border-radius: 0; margin-right: 10px; }
.sign.awesome span { position:absolute; top: 0; left: 100%; height:0; width:0; border-color: transparent transparent transparent #222; border-style: solid; border-width: 10px; }
.blue.sign span { border-color: transparent transparent transparent #2daebf; }
.green.sign span { border-color: transparent transparent transparent #2fc950; }
.grey.sign span { border-color: transparent transparent transparent #a7a8a7; }
.red.sign span { border-color: transparent transparent transparent #e33100; }
.magenta.sign span { border-color: transparent transparent transparent #a9014b; }
.orange.sign span { border-color: transparent transparent transparent #ff5c00; }
.yellow.sign span { border-color: transparent transparent transparent #ffb515; }
/* icon options */
.icon.awesome { padding-left: 40px; }
.icon.awesome span { position: absolute; bottom: -5px; left: -10px; height: 46px; width: 48px; background: url(images/button-icon.png) no-repeat 0 -46px; }

Shortcode Buttons Example

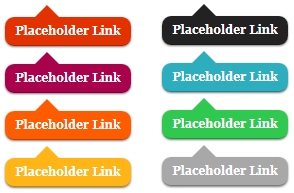
See what I mean about the CSS ending up to be fairly large? In order to get the color examples (image) it increases the size quite a bit. I randomly selected button colors, so feel free to change the colors, or even wipe out most of them.

There are 4 button types, a standard button, speak option, sign option and a icon option which can also be tinkered with. The hover state uses a .png file, I opted for image gradient on the button because it would take tons more code to set hover gradients with CSS3, because of color options and vendor prefixes. You can download the shortcode images used for the hover state and icon type. Place them in the root directory of your WordPress theme in the “images” folder. Really these are just place holders, so it is up to you if you even need them.

Modify wpautop and wptexturize

Insert into functions.php in the WP theme folder.


// clean up formatting in shortcodes
function snix_clean_shortcodes($content) {   
	$array = array (
		'<p>[' => '[', 
		']</p>' => ']', 
		']<br />' => ']'
	);

	$content = strtr($content, $array);
	return $content;
}
add_filter('the_content', 'snix_clean_shortcodes');

The little snippet above from www.johannheyne.de will fix the auto line breaks <br> and empty paragraphs <p></p> inside the shortcodes. There are probably similar ones out there, but I have not found another solution to turn off the auto line breaks and paragraphs inside the shortcode without disabling them completely. I would not recommend completely disabling the wpautop and wptexturize feature because all paragraphs will need to be manually inserted, which won’t be fun for a client.

I have been sitting on this Button Shortcode snippet for a while now, I originally intended to use it as a flexible prepacked button system for WordPress Themes. I had figured these shortcodes would be much easier, in the end they are all actually kind of a pain in the ass, mostly because of the wpautop filter, not to mention how mentally frustrating they can become since some shortcodes can promote very bad coding practices. A good example of a dumb shortcode is using it to replace an H1 tag, just use a correct MOFO H1 Tag.

Categories
Posts

Stupid WordPress Easter Egg

It looks like if you are in the post revision screen and compare a post to itself, which is dumb in the first place, but still, you will get this hidden gem. I hate to be that one guy, but it just doesn’t seem like the refined WordPress CMS experience and reminds me more of a Sub7 feature which is a old school back door trojan program. It even spells the words slowly as if typed in real time, scary l33t h4x0r stuff.

I can imagine some intern at a company scared to death once the “self destruct” pops up on the screen and then goes black with some Matrix style quotes below.

Categories
Posts

Polishing Thematic’s Head

I apologize in advance for the subtle sexual innuendo throughout the post, but I will be focusing on the “Head” of a Thematic Theme Framework child theme. Unless you are a code Nazi you may have not noticed Thematic’s head is a little bloated, even right out of the box (zip?). There is just some markup that does not need to be in the head of the document. After a short time of working on a child theme, especially adding plugins, the head of your document will be unnecessarily swollen. Hopefully this set of snippets for your functions.php file will let you relieve some of that stress.

Modifying the Thematic Robot Meta

Ok, the way Thematic is set up for SEO is really good, so by default you won’t be having duplicate content issues. But… if you view source you may see this guy in there.


<meta name="robots" content="index,follow" />

This just rubs me the wrong way. Why? Because it is the browser default, having nothing there would tell the browser the same thing as this meta tag. So removing it seems like a good way to clean things up. The code below just removes the line and moves a little structure around for correct spacing, that’s it. Simple.


// remove the index and follow tags from header since it is browser default. 
// http://scottnix.com/polishing-thematics-head/ 
function childtheme_create_robots($content) { 
  global $paged; 
  if ( thematic_seo() ) { 
    if ( ( is_home() && ($paged < 2 ) ) || is_front_page() || is_single() || is_page() || is_attachment() ) { 
      $content = ""; 
    } elseif ( is_search() ) { 
      $content = "\t"; 
      $content .= "<meta name=\"robots\" content=\"noindex,nofollow\" />"; 
      $content .= "\n\n"; 
    } else { 
      $content = "\t"; 
      $content .= "<meta name=\"robots\" content=\"noindex,follow\" />"; 
      $content .= "\n\n"; 
    } 
      return $content; 
    } 
  } 
add_filter('thematic_create_robots', 'childtheme_create_robots');

Removing Duplicate Canonical Tag in Thematic

Don’t ask me why there are two canonical tags called on single() pages, while they won’t cause any harm, they just look bad in your markup. I have only tested this with Yoast’s WordPress SEO plugin, but with almost any WordPress Plugin you will still get 2 canonical tags, it has to be a Thematic issue, but oh well. Lets fix that.


// remove Thematic canonical tag
function childtheme_canonical_url() {
// silence
} 
add_filter('thematic_canonical_url', 'childtheme_canonical_url');

This was reported to the Google code project section where Thematic issues are held, hopefully it gets resolved.

Update: Looks like my report was accepted and the duplicate content issue was resolved on revision r774, awesome. Which makes the above snippet no longer needed for Thematic 1.0+

Even more, not Thematic specific though.

Some people may not be as excited about this last one as the previous two, but there are a few more things that I don’t use, or don’t need. I have commented what they are so you can search around to find more about them, but I am still yet to use them. This code snippet removes up to 6 lines of code from the head depending what page you are on and will work with any WordPress installation, not just Thematic.


// clean up some useless unneeded links in the head section
// remove really simple discovery
remove_action('wp_head', 'rsd_link');
// remove windows live writer xml
remove_action('wp_head', 'wlwmanifest_link');
// remove index relational link
remove_action('wp_head', 'index_rel_link');
// remove parent relational link
remove_action('wp_head', 'parent_post_rel_link');
// remove start relational link
remove_action( 'wp_head', 'start_post_rel_link'); 
// remove prev/next relational link
remove_action( 'wp_head', 'adjacent_posts_rel_link_wp_head');
 // remove wordpress version (security issue), not needed for thematic
remove_action( 'wp_head', 'wp_generator');

Now someone might say but “OMG, removing the previous/next, parent and index relational links are bad for SEO!”. To that I say prove it. I just look at it as one less way to control how your pages link if you were really working on solid structure (information architecture) since it links what was literally previous or next even though they may not be related.

Is that it for cleaning up Thematic’s head?

Nope, depending on what plugins you are using or jQuery you have loading in WordPress, there could be a ton of other things. Originally this post contained some other best practices, but I only scratched the surface and the information would probably raise a lot of questions so I removed it till I can provide more comprehensive information. Instead this post will focus on the first few things you may want to do with a child theme to tidy up a bit.