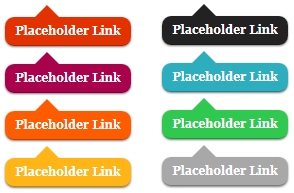
The idea for these shortcode buttons originally came from a tutorial on Adding Versatile Button Shortcodes to your WordPress Theme from mysitemyway.com, I highly recommend checking out their site for another reference on different buttons. Originally, I liked the simplicity of the tutorial, but wasn’t crazy about the wall of CSS accompanying them. Well come to find out after making my own with a modified Zurb.com CSS3 button, they ended up being pretty complex also, but they are still a viable option if you absolutely must have shortcode buttons for theme development.

This set of snippets can easily be modified into a plugin, it is not hard at all, you would be suprised, take a look at creating a custom functions plugin for end users for directions. Also hopefully you have your bases down before tackling something like this, not recommended for anyone who doesn’t understand CSS and PHP, although the links in this article should help.
The PHP Shortcode Button
Insert into functions.php in the WP theme folder.
// button shortcodes resources:
// http://tutorials.mysitemyway.com/adding-column-layout-shortcodes-to-a-wordpress-theme/

function snix_shortcode_button( $atts, $content = null ) {
    extract(shortcode_atts(array(
    'link'  => '#',
    'title' => 'View Link',
    'target'=> '',
    'size'  => '',
    'color' => '',
    'type' => '',
    'align' => '',
    ), $atts));

    $target = ($target == 'blank') ? ' target="_blank"' : '';
    $align = ($align) ? ' align'.$align : '';
    $color = ($color) ? ' '.$color : '';
    $type = ($type) ? ' '.$type : '';

    $out = '<a' .$target. ' class="' .$size.$color.$type.$align. ' awesome" href="' .$link. '" title="' .$title. '"><span></span>' .do_shortcode($content). '</a>';

    return $out;
}
add_shortcode('button', 'snix_shortcode_button');
If you are really paying attention, you will see some differences, the big ones being the option for a title on the links, the span is a little more flexible for doing some fun things with images and icons and some extra css hooks. Other than that, it is basically the same set up. The CSS is where it gets quite different.
The CSS for the Shortcode Button
Insert into style.css in the WP theme folder.
a.awesome, button.awesome { position: relative; display: inline-block; margin-bottom: 18px; padding: 10px 15px 9px; background: #222; color: #fff; text-decoration: none; font-weight: bold; line-height: 1; font-size: 12px; text-shadow: 0 -1px 1px rgba(0, 0, 0, 0.35); cursor: pointer; -moz-border-radius: 8px; -webkit-border-radius: 8px; border-radius: 8px; -moz-box-shadow: 0 1px 3px rgba(0, 0, 0, 0.5); -webkit-box-shadow: 0 1px 3px rgba(0, 0, 0, 0.5); box-shadow: 0 1px 3px rgba(0, 0, 0, 0.5); border-bottom: 1px solid rgba(0, 0, 0, 0.25); }
button.awesome { border: 0; }
a.awesome:hover, button.awesome:hover { background-image: url(images/button-overlay.png); text-shadow: 0 -1px 3px rgba(0, 0, 0, 0.35); }
/* button sizes ---------- */
.small.awesome { font-size: 12px; padding: 8px 10px 8px; }
.medium.awesome { font-size: 14px; }
.large.awesome { font-size: 18px; padding: 14px 15px; }
/* button colors ---------- */
.blue.awesome { background: #2daebf; }
.green.awesome { background: #2fc950; }
.grey.awesome { background: #a7a8a7; }
.red.awesome { background: #e33100; }
.magenta.awesome { background: #a9014b; }
.orange.awesome { background: #ff5c00; }
.yellow.awesome { background: #ffb515; }
/* specific button types ---------- */
/* speak option */
.speak.awesome { -moz-border-radius: 9px; -webkit-border-radius: 9px; border-radius: 9px; }
.speak.awesome span { position:absolute; bottom:100%; left: 30px; height:0; width:0; border-color: transparent transparent #222 transparent; border-style: solid; border-width: 12px; }
.blue.speak span { border-color: transparent transparent #2daebf transparent; }
.green.speak span { border-color: transparent transparent #2fc950 transparent; }
.grey.speak span { border-color: transparent transparent #a7a8a7 transparent; }
.red.speak span { border-color: transparent transparent #e33100 transparent; }
.magenta.speak span { border-color: transparent transparent #a9014b transparent; }
.orange.speak span { border-color: transparent transparent #ff5c00 transparent; }
.yellow.speak span { border-color: transparent transparent #ffb515 transparent; }
/* sign options */
.sign.awesome { -moz-border-radius: 0; -webkit-border-radius: 0; border-radius: 0; margin-right: 10px; }
.sign.awesome span { position:absolute; top: 0; left: 100%; height:0; width:0; border-color: transparent transparent transparent #222; border-style: solid; border-width: 10px; }
.blue.sign span { border-color: transparent transparent transparent #2daebf; }
.green.sign span { border-color: transparent transparent transparent #2fc950; }
.grey.sign span { border-color: transparent transparent transparent #a7a8a7; }
.red.sign span { border-color: transparent transparent transparent #e33100; }
.magenta.sign span { border-color: transparent transparent transparent #a9014b; }
.orange.sign span { border-color: transparent transparent transparent #ff5c00; }
.yellow.sign span { border-color: transparent transparent transparent #ffb515; }
/* icon options */
.icon.awesome { padding-left: 40px; }
.icon.awesome span { position: absolute; bottom: -5px; left: -10px; height: 46px; width: 48px; background: url(images/button-icon.png) no-repeat 0 -46px; }

See what I mean about the CSS ending up to be fairly large? In order to get the color examples (image) it increases the size quite a bit. I randomly selected button colors, so feel free to change the colors, or even wipe out most of them.
There are 4 button types, a standard button, speak option, sign option and a icon option which can also be tinkered with. The hover state uses a .png file, I opted for image gradient on the button because it would take tons more code to set hover gradients with CSS3, because of color options and vendor prefixes. You can download the shortcode images used for the hover state and icon type. Place them in the root directory of your WordPress theme in the “images” folder. Really these are just place holders, so it is up to you if you even need them.
Modify wpautop and wptexturize
Insert into functions.php in the WP theme folder.
// clean up formatting in shortcodes
function snix_clean_shortcodes($content) {
	$array = array (
		'<p>[' => '[',
		']</p>' => ']',
		']<br />' => ']'
	);

	$content = strtr($content, $array);
	return $content;
}
add_filter('the_content', 'snix_clean_shortcodes');
The little snippet above from www.johannheyne.de will fix the auto line breaks <br> and empty paragraphs <p></p> inside the shortcodes. There are probably similar ones out there, but I have not found another solution to turn off the auto line breaks and paragraphs inside the shortcode without disabling them completely. I would not recommend completely disabling the wpautop and wptexturize feature because all paragraphs will need to be manually inserted, which won’t be fun for a client.
I have been sitting on this Button Shortcode snippet for a while now, I originally intended to use it as a flexible prepacked button system for WordPress Themes. I had figured these shortcodes would be much easier, in the end they are all actually kind of a pain in the ass, mostly because of the wpautop filter, not to mention how mentally frustrating they can become since some shortcodes can promote very bad coding practices. A good example of a dumb shortcode is using it to replace an H1 tag, just use a correct MOFO H1 Tag.


